
WebView2 を使うと、C#側から JavaScript を挿入する事が出来るので、開いたページを JavaScript で操作出来ます。
関連記事
目標
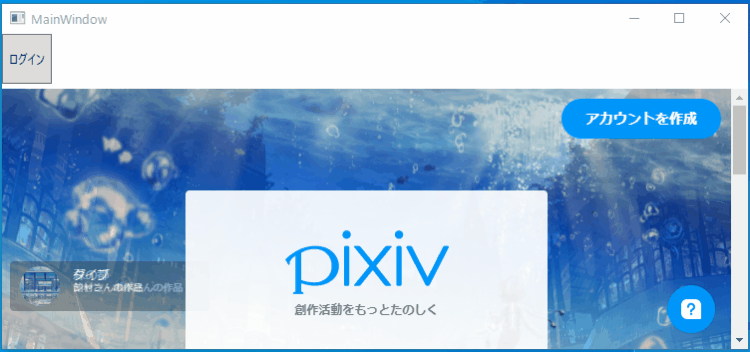
ログインボタンを押したら、IDとパスワードを自動で入力してログインする。
環境
- Windows 10 Home 20H2
- Visual Studio Community 2019
- .NET Core 3.1
- Microsoft.Web.WebView2 1.0.721-prerelease
JavaScript を挿入する
C#側から JavaScript を挿入するには、下記コードを使用します。
1 | webView.CoreWebView2.ExecuteScriptAsync($"alert('挿入されたアラートダイアログ!')"); |
例えば、上記コードをボタン押下時に実行するとこんな感じになります。
あたかも Googleページがアラートを出した感じがしますが、挿入した JavaScript が出したものです。

コレを応用して、ボタンを押したら自動ログインする機能を実装します。
ログイン画面の調査
自動ログインを作るっと言っても、まずは調査から始まります。当たり前ですね。
とりあえず今回は pixiv に自動ログイン出来るようにします。pixiv はログインがザルなので簡単なんです。Yahoo とか Google は、2段階認証とかがあってちょっと難しいので今回はパス。
ログインには何が必要なのか?
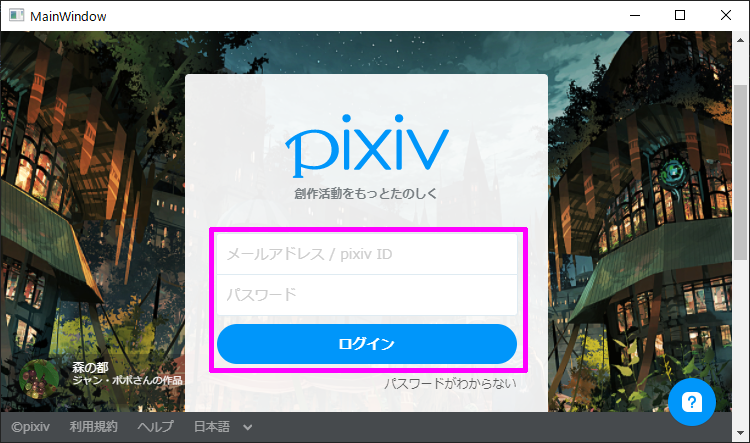
pixiv にログインするには何が必要なのか?
ログインページ を見れば一発で分かりますね。「ID」「パスワード」それと「ログイン」ボタンです。
調査方法
調査方法は簡単。「ID」「パスワード」「ログイン」が特定出来れば OK なのです。
まず、Chrome で pixivログインページ を開いて、ID のところを右クリック「検証」を選択する。
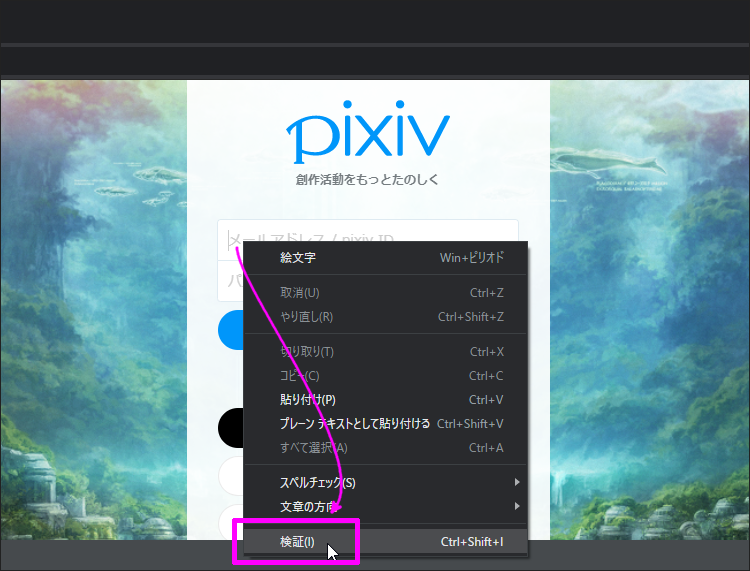
そうすると、Chrome の DevTools が表示されます。
しかも ID のソースの部分が表示されているので、ID のソースの部分を右クリックして「Copy > Copy JS path」を選択します。
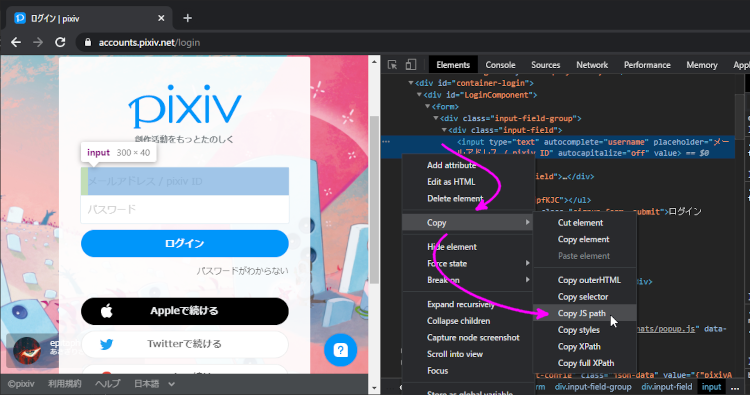
これで、ID を特定できる JavaScript がクリップボードにコピーされました。
一度、メモ帳に貼り付けて置きます。
多分こんなコードが張り付くんじゃないでしょうか。
1 | document.querySelector("#LoginComponent > form > div.input-field-group > div:nth-child(1) > input[type=text]") |
同じ要領で パスワード と ログインボタン も調べます。最終的に、こんな感じになれば OK です。
1 | document.querySelector("#LoginComponent > form > div.input-field-group > div:nth-child(1) > input[type=text]") |

少し整形
このままでもいいんですが、後々のために少し整形して置きます。
“ (ダブルクォート) を ‘ (シングルクォート) に置換
C# のソースに貼り付けた時に “ (ダブルクォート) だと問題があるので、事前に ‘ (シングルクォート) に置換して置きます。
カッコの中にある 6箇所 ですね。
1 | document.querySelector('#LoginComponent > form > div.input-field-group > div:nth-child(1) > input[type=text]') |

inputタグ には value を、buttonタグ には click を追加
このままだと、まだ「場所が特定出来た」に過ぎないので、inputタグ には value を、buttonタグ には click を追加します。
inputタグ は文字が入力できるので、value に入力させたい文字を設定して置きます。今回の場合は IDとパスワードです。buttonタグ はクリックさせたいので click を追加します。で、行の末尾に ; (セミコロン) を入れます。
こんな感じになれば OK です。
1 | document.querySelector('#LoginComponent > form > div.input-field-group > div:nth-child(1) > input[type=text]').value = '★★★ ID ★★★'; |

ログイン機能の実装
ここまで出来たら、後は C#側に貼り付けるだけです。
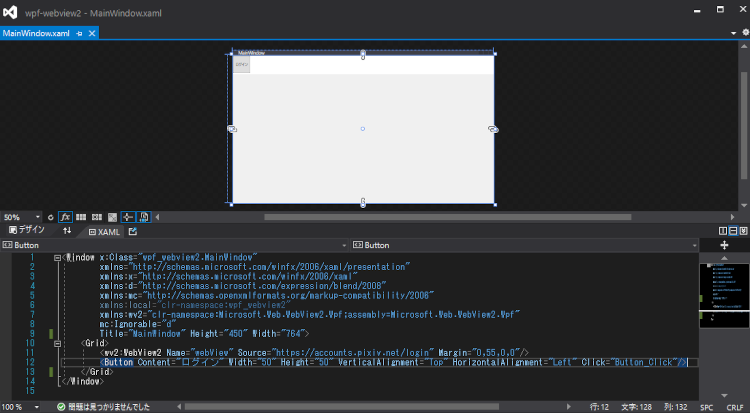
「MainWindow.xaml」にボタンを置いて、
1 | <Window x:Class="wpf_webview2.MainWindow" |
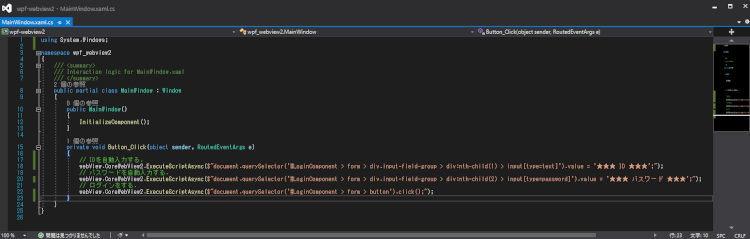
コードビハインド に Button_Clickイベント を書きます。
1 | private void Button_Click(object sender, RoutedEventArgs e) |
F5キーで実行して、左上のログインボタンを押すと 自動ログイン する事が確認出来ます。