WPF の 標準コントロールを マテリアルデザインスタイル に変えてくれるパッケージを使って、簡単にお洒落な WPF アプリを作っていきます。
マテリアルデザインとは、Google が推奨する 一貫性のある馴染みやすいデザインのことです。Google が推奨しているということは、世界中で愛されるということになるので、世界基準の一流デザインを取り入れることになります。
マテリアルデザインを取り入れたアプリが簡単に作れる「MaterialDesignThemes」パッケージを使って、いろいろ試していきたいと思います。
https://github.com/MaterialDesignInXAML/MaterialDesignInXamlToolkit
今回は、MaterialDesignThemes の Dialog を試したいと思います。
はじめに
開発環境
- Windows 10 Home 1903
- Microsoft Visual Studio Community 2019 Version 16.4.1
- MaterialDesignThemes 2.6.0
- MaterialDesignColors 1.2.0
プロジェクト作成
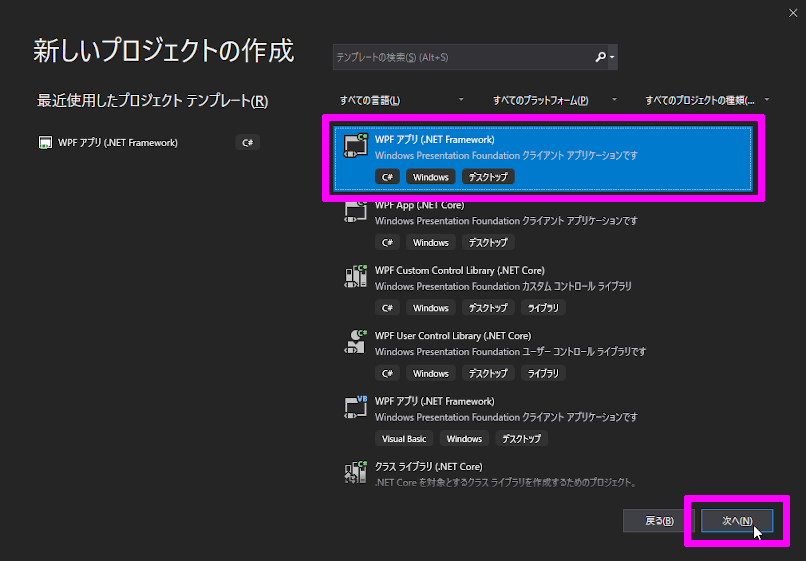
まず初めに、プロジェクトを作成します。

Blend を立ち上げて、「WPF アプリ(.NET Framewrk)」でプロジェクトを作成します。
「MaterialDesignThemes」パッケージ追加
ソリューション エクスプローラー のプロジェクトを右クリックして「NuGet パッケージの管理」を選択します。
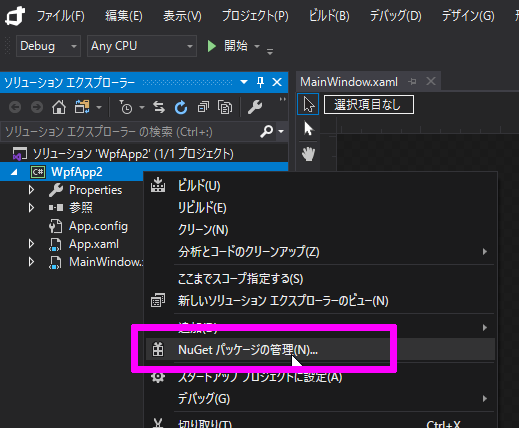
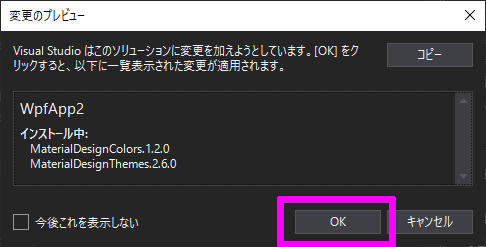
NuGet パッケージ マネージャー の検索欄に「MaterialDesignThemes」と入力しパッケージをインストールします。
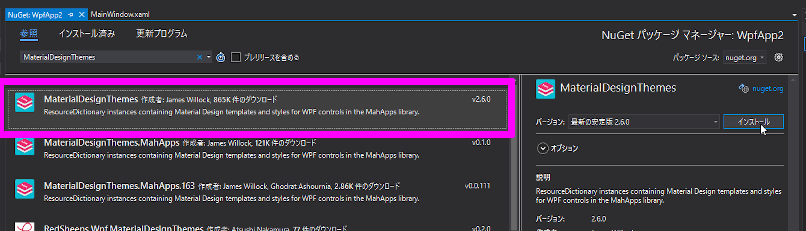
同時に「MaterialDesignColors」も入りますが、必須ですし使うので大丈夫です。
処理
MainWindow.xaml
1
2
3
4
5
6
7
8
9
10
11
12
13
14
15
16
17
18
19
20
21
22
23
24
25
26
27
28
29
30
31
32
33
34
35
36
37
38
39
40
41
42
43
44
45
46
47
48
49
50
51
52
| <Window
x:Class="WpfApp.MainWindow"
xmlns="http://schemas.microsoft.com/winfx/2006/xaml/presentation"
xmlns:x="http://schemas.microsoft.com/winfx/2006/xaml"
xmlns:d="http://schemas.microsoft.com/expression/blend/2008"
xmlns:materialDesign="http://materialdesigninxaml.net/winfx/xaml/themes"
xmlns:mc="http://schemas.openxmlformats.org/markup-compatibility/2006"
Title="MainWindow" Width="500" Height="250" mc:Ignorable="d">
<Window.Resources>
<ResourceDictionary>
<ResourceDictionary.MergedDictionaries>
<ResourceDictionary Source="pack://application:,,,/MaterialDesignThemes.Wpf;component/Themes/MaterialDesignTheme.Light.xaml" />
<ResourceDictionary Source="pack://application:,,,/MaterialDesignColors;component/Themes/Recommended/Primary/MaterialDesignColor.Teal.xaml" />
<ResourceDictionary Source="pack://application:,,,/MaterialDesignThemes.Wpf;component/Themes/MaterialDesignTheme.Button.xaml" />
<ResourceDictionary Source="pack://application:,,,/MaterialDesignThemes.Wpf;component/Themes/MaterialDesignTheme.DialogHost.xaml" />
<ResourceDictionary Source="pack://application:,,,/MaterialDesignThemes.Wpf;component/Themes/MaterialDesignTheme.ProgressBar.xaml" />
</ResourceDictionary.MergedDictionaries>
</ResourceDictionary>
</Window.Resources>
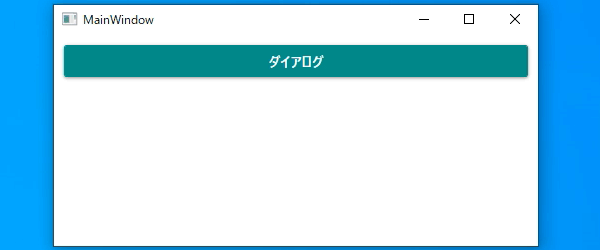
<materialDesign:DialogHost Identifier="RootDialog" SnackbarMessageQueue="{Binding ElementName=MainSnackbar, Path=MessageQueue}">
<Grid>
<Button
x:Name="ShowDialog"
Margin="10,10,10,0"
VerticalAlignment="Top"
materialDesign:DialogHost.DialogClosingAttached="Sample2_DialogHost_OnDialogClosing"
Command="{x:Static materialDesign:DialogHost.OpenDialogCommand}"
Content="ダイアログ"
Style="{StaticResource MaterialDesignRaisedButton}">
<Button.CommandParameter>
<StackPanel Margin="16">
<ProgressBar
Margin="16"
HorizontalAlignment="Center"
IsIndeterminate="True"
Style="{DynamicResource MaterialDesignCircularProgressBar}"
Value="0" />
<Button
x:Name="CloseDialog"
HorizontalAlignment="Center"
Command="{x:Static materialDesign:DialogHost.CloseDialogCommand}"
CommandParameter="Sample2Cancel"
IsCancel="True"
Style="{StaticResource MaterialDesignFlatButton}">
CANCEL
</Button>
</StackPanel>
</Button.CommandParameter>
</Button>
</Grid>
</materialDesign:DialogHost>
</Window>
|
XAML(ザムル) だけで ダイアログの表示と非表示が出来ちゃうのすごいですね。
「ResourceDictionary」で マテリアルデザインのリソースを読み込んでいます。これを書かないと、マテリアルデザインのダイアログを使う時にエラーで怒られるので必ず書きます。
「materialDesign:DialogHost」で マテリアルデザインのダイアログ表示領域を括ります。この中でしかダイアログが有効にならないので、今回は大枠で括っておきます。
「Button.CommandParameter」の中がダイアログの中身になります。
コードビハインドでダイアログ制御するには?
XAML に書いたボタンの Command を呼んであげれば、表示と非表示が出来るようになります。
1
2
| // ダイアログ表示.
ShowDialog.Command.Execute(ShowDialog.CommandParameter);
|
1
2
| // ダイアログ非表示.
CloseDialog.Command.Execute(CloseDialog.CommandParameter);
|
閉じるだけなら次のコードでもできました。
おわりに
ボタンの中にダイアログの中身を書いているから、ボタンが無いとダイアログが作れないんですよね。
ちょっと癖があるけど、使いこなせたら強い味方になってくれること間違いなしです。
GitHub
ソースコード